
I'm
excited today to share how I created these mini envelopes using some Pretty Pink Posh dies, stamps, and sequins. It’s quite simple and easy to create
these for a gift card, money, and or add a simple note inside for any
occasion.
Let's
get started as there are several photos to help assist seeing how this came
together. Grab some coffee or tea and enjoy!

With
just a few steps, you can create several mini envelopes ahead of time to have ready for
any occasion

First
Step: Cut a
piece of white card stock measuring 4" x 5 1/2"

Step
Two: Score
the card stock at 3/8" and 3" mark

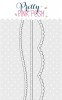
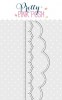
Step Three: Turn
the cardstock piece and place the border die on top to run through the die cut
machine. Here, I used the Stitched
Borders 2 and for the second card I used the new Scallops Borders die.

After
die cutting the borders, I used a bone folder to ensure the score lines were
pressed down firmly.

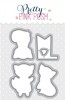
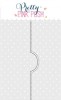
Step Four: Here,
I used the Stitched Duo 2 to die cut a stitched rectangle
using white card stock. Next, I took the Pocket Border die and placed on top of the rectangle
to create the inside of the mini envelope.

Step Five: When
creating projects, I prefer to use a stronger adhesive, here I used 1/4"
Scor Tape and added to the bottom of the 3/8” score line and on the sides of
the second piece which goes on the inside.

Here
you can see a mini envelope was created with just a few steps. At this point,
you can leave as is, but I decided to decorate it.


To decorate: I
took some designer paper measuring 2 1/2" x 4 1/2" and used
the same scallop borders as the mini envelope. As I wanted some wiggle room to
match up the scallops, I cut the designer paper a little wider than the
envelope itself.

After
die cutting the borders from the designer paper, I lined up the paper to the
front flap of the card and than turned the mini envelope over to draw a line where I needed to
trim the paper.

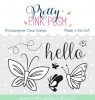
For
this one, I used the Blissful
Butterflies stamp set
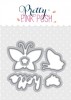
along with the Blissful
Butterflies Coordinating die to help me cut one (1) of the
butterflies for the center. Next, I took these adorable flower sequins from the
new Tropical
Flower Sequins Mix to
add on top.

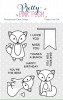
For
this card, I used the new Fox Friends set along with the Fox Friends Coordinating dies to once again assist me in cutting. Also, since I wanted a border behind the fox, I cut a strip of Kraft card stock and used the Stitched Borders 2 (straight border) to create the stitches.

Here
are some ideas of what you could put inside - A gift card or money

Another
idea would be to create a simple note card to add inside as a thank-you, just because, and/or to cheer someone up.


Since I
wanted the note card to match the envelope, I took an image from each set and
stamped directly onto the card stock. Measurements for the note cards: 3 3/8" x 2 1/2" and than used a corner punch to round them.

To
close these mini envelopes, I used a small glue dot and placed on the inside of
the flap. This way, the envelope remains sealed until opened for a surprise.
Hope you enjoyed and thanks for hanging in with me today!
Also, I'm entering these mini envelopes for the Simon Says Stamp Wednesday Challenge of "Anything Goes"
SUPPLIES:


.jpg)


These are adorable Liz!
ReplyDeleteFABULOUS tutorial!! Love the clean and crisp design! Thanks so much for playing Simon Says Stamp Wednesday “Anything Goes” Challenge! Beautiful colors and design. Well done!
ReplyDeleteLiz, Your cards are soo cute ! Thank you for sharing with us.
ReplyDeleteLiz, Your cards are soo cute ! Thank you for sharing with us.
ReplyDelete