Tuesday, June 12, 2018

Fly Away Friends and Dream Big

Back today with another card to join Kathy's 30 day color challenge. All the details on her blog, The Daily Marker

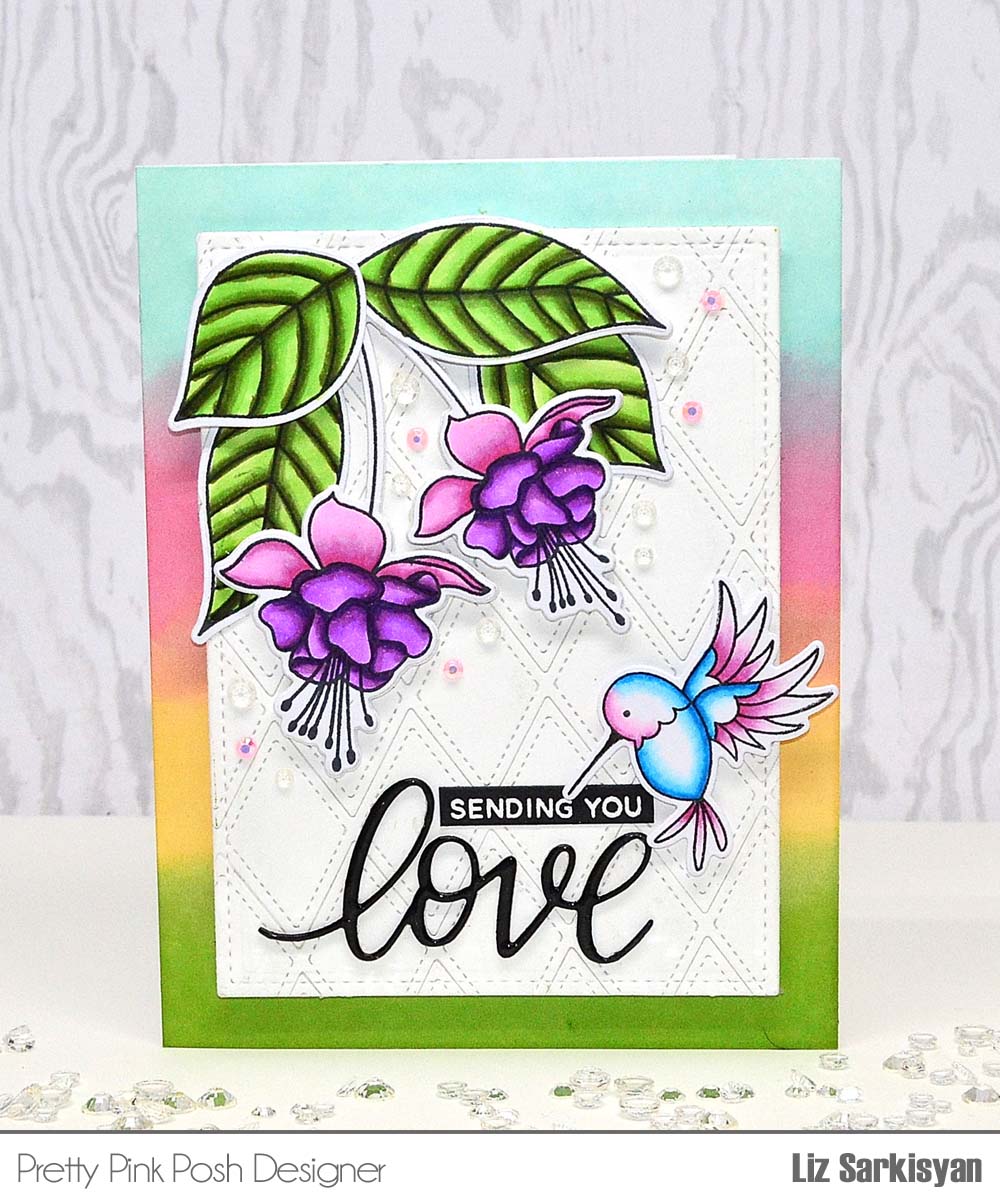
For this card, I pulled out this adorable Fly Away Friends set from Pretty Pink Posh as I love these little critters along with the different balloons and little hearts.  

Once again, I started off by creating the background by using a Sun Ray stencil and added some yellow rays using an ink blending tool.  

Next, I pulled out these Scallop Frames die to use for the shaker portion of the card and decided to keep it white. From there, I used the scallop border from the Stitched Borders 2 collection to create the cloud. 

To add a little blue to the cloud, I ended up die cutting another scallop border and used Salty Ocean distress oxide to add some color and than pieced them together.

This Fly Away Friends set has several sentiments to choose from so I combined two of them together and embossed it using white embossing powder. Plus, I couldn't resist but to use these little hearts from the set. The Coordinating Die made it easy to cut them out. 

To fill this shaker, I first glued down some Silver Mini Star Confetti and than went a little crazy adding in 1/4" Iridescent Star Confetti along with Sparkling Clear Mix which has an assortment of sizes ranging from 4mm through 10mm sequins.

Last but not least, I added some foam mount tape under the balloon and little critter to pop him up. Also, to add even more sparkles, I added some Pearl White jewels around the sentiment as it has a nice contrast against black card stock.


Friday, June 8, 2018

Sending You Love with Flourishing Fushia

Back today with a card to join Kathy's 30 day color challenge. All the details on her blog, The Daily Marker

When I saw these Flourishing Fuchsias from Pretty Pink Posh I couldn't resist but to create a special card of sending you love. 

To get this card started, I created the background first using an ink blending tool along with some ink from Simon Says Stamp. 

Colors from top to bottom: Maliblue, Hollyhock, Duckling, and Green Leaf.

Next, I used the diamond shape border from the Stacked Edges 2 collection to create the quilt panel in the center by cutting several rows and placed them together onto a piece of card stock. Later, I ran it through the die cut machine using the Stitched Notes die 

Once again, I couldn't resist but to use the Hummingbird Thanks set so I stamped one of them to color using my copic markers. After coloring, I used the Coordinating dies to help me cut it out fast.  

Here is the list of Copic color combination is:  

Wing & Head: RV55, RV02 (head)  RV55, RV52, RV02 (Wings)
Body: B06, B02, B00, B000, also the colorless blender to smooth things over and take away color from the center of the body and ends of wings

Flowers: RV55, RV52, RV02 & V09, V06, V04 Leaves: G21, G94, G99

Can you guess what new product I used? It's the word "Love" from the new Love You Script die from Pretty Pink Posh latest release and now available. To add some gloss on top, I used clear embossing powder and repeated the process three times and than embossed the "SENDING YOU" from the Rainy Days Additions using white embossing powder. 

To finish this card, I added several jewels using Pink Blush and Sparkling Clear to combine both as I love how they look together.

SUPPLIES: