Wednesday, January 31, 2018

Just For You with Love using Vintage Roses and Pretty Pink Posh

I'm back today with another card and thought to join the Simon Says Stamp Wednesday Challenge of Anything Goes this week.

Since I was playing with vellum, I thought why not incorporate it into a card along with using a word die to create the background. 

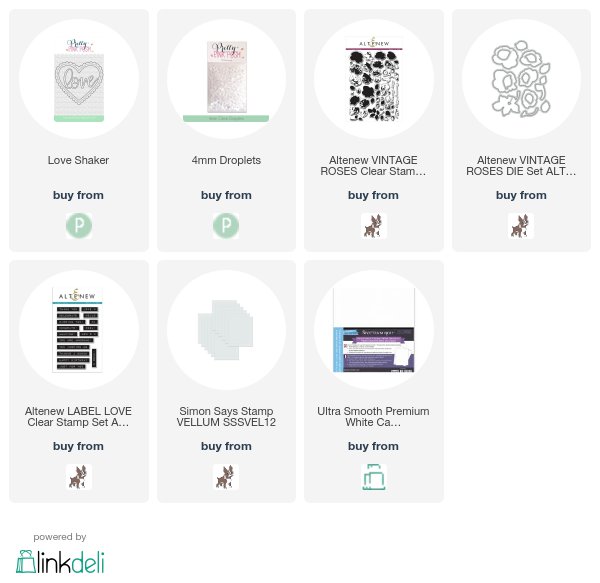
Started off this card by adding several word dies onto a white panel with the word "LOVE" from the new Love Shaker die, from Pretty Pink Posh 

TIP: To cut just the word out, I cut rectangles 2 3/4" x 1 5/8" and placed over just the word before die cutting. 

Here is what it looked like when I finished the panel and really like how the background turned out as this font is so pretty.

Next, added a panel of vellum from Simon Says Stamp measuring: 4 1/2 x 3 1/4"

Stamped these beautiful flowers using Vintage Roses from Altenew along with using their Coordinating die to help me cut them out. 

For the sentiment, I pulled out Label Love, also from Altenew since I wanted a solid block sentiment to go across. 

For the flowers and leaves, I used Altenew's inks since it already has a light med and dark tones to easily create this look. To finish off this card, I added some beautiful small Clear Droplets from Pretty Pink Posh


SUPPLIES:

Tuesday, January 30, 2018

Hello Friend

I'm back today with another card and quick post to join another day of Kathy's 30 day color challenge. All the details on her blog, The Daily Marker.

I was watching Jennifer McGuire's video on Alcohol ink lift with stencils and wanted to give it a try using vellum. I decided to keep it as a full panel and use this fabulous Hello Friend Script die which I die cut three times and glued together to give some dimension.

Also added one of the Hummingbirds from the Hummingbird Thanks stamp set from Pretty Pink Posh that was colored using my copic markers.

Wing & Head: RV29, RV25, RV21, Y11
Body: B06, B02, B00, B000, also the colorless blender to smooth things over and take away color from the center of the body and ends of wings

Last but not least added some 4mm Sparkling clear sequins and kept it clean and simple. 


Pretty Pink Posh Valentine Theme Week


Here is a sneak peek at my card today using these adorable Woodland Critters set plus more so come and join me on the Pretty Pink Posh Blog today as we celebrate Valentine Theme Week. 

More photos and details on how I made this card can be seen by clicking here to go straight to the post. 

Lots more inspiration coming all week long on the the Pretty Pink Posh Blog showcasing Valentine Theme inspiration that you don't want to miss!


Monday, January 29, 2018

Hello with Hummingbird

I'm back today with another card to join another day of Kathy's 30 day color challenge. All the details on her blog, The Daily Marker. Lots of fun. Also, joining again over at Simon Says Stamp Wednesday Challenge of Layer it Up

I couldn't resist but to make another card using these new Hummingbird Thanks stamp set from Pretty Pink Posh and decided to combine it with Pretty Petunias set. 

After coloring these adorable birds, I used the Coordinating dies to help me cut them out. 

Here is the list of Copic color combination is:  

Wing & Head: RV29, RV25, RV21, Y11
Body: B06, B02, B00, B000, also the colorless blender to smooth things over and take away color from the center of the body and ends of wings

Flower: RV29, RV25, RV21
Leaves: G21, G94, G99

For the sentiment, I used the Hello Friend Script die which I cut using black card stock and than clear embossed it three times to give it a glossy enamel look along with some dimension.   

To do this tag, I die cut a tag using the Stitched Duo 1 without the squares and trimmed off the bottom approx 1/4" and added some clouds to it. From there, I added a scallop border using the Stacked Edges 1 using some red card stock. 

Since I wanted just the bottom scallops to show, I cut a strip of black card stock to lay on top.

For the background, I die cut a panel using the Stitched Notes die and did some ink blending using Simon Says Stamp inks along with ranger blending tool.

Colors from top to bottom: Maliblue, Teeny Bikini, Melon, Duckling, Green Leaf.

Last but not least, the Bee Friends set from Pretty Pink Posh has three hearts, so I used the smallest one from the Coordinating die and cut three to add to the black strip and added some 4mm Sparkling clear sequins. 

Added white fun foam underneath the base panel and also added some foam mount tape under the hummingbird and flower. 

SUPPLIES:

Saturday, January 27, 2018

Hello Friend using Watercoloring

Trying to deal with getting rid of this cold and today feeling better so I decided to finish up this card today to join another day of Kathy's 30 day color challenge. All the details on her blog, The Daily Marker. Lots of fun. Also, joining over at Simon Says Stamp Wednesday Challenge of Layer it Up

For this card, I started off by creating a watercolor background using several colors of tombow dual markers. Afterwards, I took this Butterfly Friends set from Pretty Pink Posh and embossed the images using clear embossing powder. 

Now comes the fun part, I took the square die portion from the Stitched Duo 3 to cut out little squares. Kept the same order as I was die cutting not to lose the pattern.  

Added white fun foams underneath each square to give it some dimension and placed on a white panel measuring: 3 5/8" x 4 7/8". Placed the panel on top of a pink card stock that I used for the base. 

For the sentiment, I cut a strip of black card stock and embossed the word "HELLO" using the Birdie Friends set and than die cut the word "Friend" from the same Butterfly Friends set.

Last but not least, stamped the butterflies onto vellum using black ink and die cut the images using the Coordinating die. Added several 4mm clear droplets to give illusion of water. 


Sunday, January 21, 2018

Happy Birthday

Back today with another card to join Kathy's 30 day color challenge. All the details on her blog, The Daily Marker. Lots of fun. Also, joining over at Simon Says Stamp Wednesday Challenge of adding a Sentiment. 

For this card, I started off by stamping this adorable Birthday Scene which I absolutely love. It has everything for a celebration party. From balloons to hats to the sentiment. 

I used several copic color combination and listed what I had on my desk after doing this card.  

Balloons: RV29, RV25, RV21, Y17, Y15, Y11, YG17, YG23, YG00, B04, B02, B00, RV66, RV55, RV52
Rabbit: C3, C2, C0, R20
Hedgehog: E30, E31, E29, E25, E23
Bear: E37, E35, E33, E31, E30, R20 

Added some borders using a dark, medium, and light colored card stock using the Scallop Borders Die and than cut a thin strip of gold foil card stock to add in the center of the card.

Last but not least added a little gold bow by using the Twine and Bows die along with adding a few sequins in different colors by using the 4mm Springtime Mix and a couple of 4mm Orchid sequins.

Almost forgot, I added some White Fun Foam under the entire panel before adding it to the card so it would add a little dimension.

Main SUPPLIES:

Friday, January 19, 2018

Sending you Love

Back today with another card to join Kathy's 30 day color challenge. All the details on her blog, The Daily Marker. Lots of fun. Also, joining over at Simon Says Stamp Wednesday Challenge of adding a Sentiment. 

For this card, I started off by using the Scallop Borders 2 dies and laid it down as a slanted curve before die cutting. Than, I stamped the flower image down by offsetting it to fit on the lower right hand side of the card using the Organic Blooms set from Mama Elephant.

The Copic color combination used: RV29, RV25, RV21 (flower) G99, G94, YG03 (leaves)

For the sentiment, I embossed the "SENDING YOU" from the Rainy Days Additions using white embossing powder. 

Later, I cut out the word "LOVE" using the new Love Shaker die, from Pretty Pink Posh and embossed the word using clear powder. Repeated three times which than gives it a glossy enamel look and dimension.

Since I was embossing, I thought this cute sentiment background from Simon Says Stamp called: You Matters would look great using white powder against black card stock. 

Last but not least, added some foam mount underneath the top half of the card. Basically, the entire white cardstock so it could give some dimension and overlap of the bottom. Also, added some 4mm Sparkling clear sequins. 

SUPPLIES:
>

Tuesday, January 16, 2018

Sending Lots of Love with Flowers and Hummingbirds

Back today with Day 2 of Kathy's 30 day color challenge  Check out all the details on her blog, The Daily Marker. Lots of fun. Also, joining one more time over at Simon Says Stamp Wednesday Challenge using Patterned Paper

I loved coloring these new Hummingbird Thanks stamp set from Pretty Pink Posh that I decided to use them again using a different color combo. Will list the colors used below. 

After coloring these adorable birds, I used the Coordinating dies to help me cut them out. Also, once again using the Window Frames from Pretty Pink Posh but used the smaller of the windows to use for this card. 

The Copic color combination is: At the end, I added some white dots on the wings and body using my white gel pen. 

Wing: BV00, BV02, BV08
Body: B06, B02, B00, B000, BG49, BG15, BG10, also the colorless blender to smooth things over and take away color from the center of the body and ends of wings

For the sentiment, I used the Everyday Greetings and embossed it using white powder. 

For the flowers, I used the Wild Rose stamp set and embossed them using white powder. Than, I grabbed a couple of ink pads from Simon Says Stamp to color these flowers fast by using ranger's foam blending tool. 

For the leaves, I used Jellybean and Green Leaf (both SSS)
Flowers: Hot Mama (SSS), Mango (Altenew)

Afterwards, I pulled out some Faber Castell pencils to create an even darker shadow and contrast. Again, added some white dots to the leaves. Used the Coordinating Wild Rose die to help me cut them out. 

To fill in this shaker, I used this beautiful new Rose Gold Heat Confetti along with Mini Sparkling Clear Flowers and Iridescent Mini Heart Confetti sequins. 

Last but not least, added some foam mount tape underneath the images and glued them down in place to finish off this card. 

SUPPLIES:

Monday, January 15, 2018

Birthday Wishes with Hummingbirds and Bold Blooms


Back today with Day 1 of Kathy's 30 day color challenge as she is once again hosting. Check out all the details on her blog, The Daily Marker. It's always so much fun. Also, joining this week's at Simon Says Stamp Wednesday Challenge using Patterned Paper

As you know I love using storybook dies, so I decided to create another  birthday card using Storybook 4 along with one of the new Hummingbird Thanks stamp set from Pretty Pink Posh.

I was having fun coloring with my copic markers with these adorable hummingbirds and mixed several colors together.

Wings and above beak area: RV52, RV55, RV66, Y11
Body: B06, B02, B00, B000, Y11

The Coordinating dies for this set came in handy as they cut and match the image perfectly. For the sentiment, I used one of the new sets called: Birthday Friends as it's one of my favorite fonts for the center of this card. 

For this card, I added several flowers on two of the corners by using this adorable Bold Blooms set along with the Coordinating die

To fill in this shaker, I used a combination of Hydrangea Flower Sequin Mix along with several Mini Sparkling Clear Flowers as they go perfect together. 

Last but not least, added some foam mount tape underneath the images and glued them down in place to finish off this card. 

SUPPLIES:

Sunday, January 14, 2018

Merry and Bright Christmas Card

As I was organizing my craft room today I noticed one of the Simon Says Stamp monthly kits laying around so I opened it up and noticed it's been sitting there a very long time hidden so I had to use. 

Plus, it has some cute patterned paper which is this week's challenge over at Simon Says Stamp Wednesday ChallengeAgain, one of my goals this year is to use stamp sets that have been sitting around. I call them NBUS (never been used stuff).  

Another Christmas card for the year 2018 as it's never to early to start stocking up for the year. Here I'm using this cute Merry and Bright set from Simon Says Stamp which came in the kit.

Started off by coloring these images using my copic markers and than put them aside to create a window globe shaker using one of my favorite dies, the Window Frames from Pretty Pink Posh

For the inside scene, I used some distress inks (Peacock Feathers, Salty Ocean, and Tumbled Glass). From there, I embossed some snowflakes at random and added the sentiment all from the same stamp set. 

To create a little snow hill, I pulled out the Scallop Border dies to give the illusion of more snow.

Added some fun Sparkling Clear Snowflakes in the background and glued them down in place before adding more sparkles. Here, I combined some Iridescent Mini Circles along with some Silver Shimmer Beads to make things shake and sparkle.

Last but not least, added some foam mount tape underneath the images and glued them down in place and added some 4mm Metallic Silver Sequins on top of the tree.

I'll be back tomorrow to join the start of the 30 day color challenge Kathy is hosting. 

Main SUPPLIES:

Thursday, January 11, 2018

Pretty Pink Posh New Release Blog Hop Day 2

Welcome to Day 2 of the blog hop showcasing Pretty Pink Posh's new release with tons of fun and inspiration. Plus prizes to be won as Pretty Pink Posh celebrates turning 4. 

You should have arrived from the talented Crystal Thompson, but if you get lost, no worries, there is a complete line up list below so you can stay on track during the blog hop. 

I'm beyond thrilled to share these three cards with you today, so let's get started. 

As you know I love creating shaker cards and using storybook dies, so I decided to create two birthday cards using the new Storybook 6 in celebration of Pretty Pink Posh turning 4.

Also, I'm loving this new fabulous Birthday Friends set where it comes with four adorable little kids to choose from along with balloons, hats, presents, and a cake. Here, I used the Coordinating Die to help me cut out all the images after coloring them using my Copic markers. 

To fill in this shaker, I used the new Northwest Sequins Mix and was excited to see a combination of different sizes along with 4mm clear droplets. Keep in mind, this is a limited edition and was perfect to create a neutral birthday card for either girl or boy. 

Moving onto the second card for the day....

Once again, I used this adorable Birthday Friends set as I find it perfect for any birthday celebration and adore using the balloons and hats. Also, used the Coordinating Die to help me cut them out fast and easy. 

As you can see, I'm using the new Storybook 6 once again, but this time flipped the die to use the rectangles and squares differently. Since I wanted a smaller sentiment, I found the perfect one using the new Love Sentiments set saying "All My Love." Plus, this set has the cutest hearts which I stamped at random, but some got covered up with balloons.

To fill in this shaker, I used the new Spring Blooms Mix and fell in love with the combination of pinks and various sizes together. It's absolutely gorgeous in person. This is also a limited edition you don't want to miss. 

Moving onto the third card for the day....

I'm loving these new Cupids Friends set and matching Coordinating die which makes it easy to cut them perfect and fast. For this card, I used my Copic markers once again to color them and having fun with it. 

When I saw this new Love Shaker die, lots of ideas popped into my head as I thought it was the cutest thing ever with these little scallops around the heart along with the amazing stitching detail. Plus, the word right in the center. 

For the base, I used one of the borders from the Stitched Border 3 collection and die cut 4 strips of patterned paper. 

To fill this little shaker, I grabbed the new Iridescent Heart Confetti mix as it has a wonderful combination of various size in iridescent along with the new Red Mini Hearts that I absolutely love. 
  
Let's continue celebrating with your next stop with the talented Lisa Elton

GIVEAWAY! During this blog hop, there will be (6) $50 Gift Certificates to Pretty Pink Posh up for grabs every day (2) $50 Gift Certificates on each day

Winners will be picked at random based on comments left along the blog hop and will be announced on the Pretty Pink Posh Blog


SUPPLIES: