Showing posts with label Get Well Cards. Show all posts

Tuesday, May 29, 2018

Get Well Soon using Playful Puppies

Getting back into gear again as I've been having lots of fun creating and coloring which is always the best medicine to make one feel better. Therefore, I plan on sharing more cards to come and decided to start with this card using this adorable Playful Puppies from Pretty Pink Posh along with some new jewels.

I really love this set has it makes me smile. Not only do I love dogs, but they have a cheerfulness that made my day so I thought to combine this fabulous Get Well Soon script die along with using the Stacked Edges 1 border to create this card. Also, I decided to use a different color combo that could be used for either male or female.

I'm in love with these new jewels and so happy to have them in Metallic Gold as it works perfect with this card. Almost forgot, I used the Coordinating die to help me cut out this cute little puppy and ended up die cutting the words twice to stack them together to have them pop up.

SUPPLIES:

Sunday, October 9, 2016

Sending Hugs and Get Well Wishes

I love when you can get more use out of your dies, so today I wanted to show how to create your own background using these cute Stitched Essentials 1 from from Pretty Pink Posh as you can create so many things with all of the dies included in the set with basic shapes, tags, and more. 

To start this mini card, I pulled out some white card stock and cut a 5" x 7" piece and folded in half so the finish size would be a 3.5" x 5" inch card. I put it aside while I worked on creating my background.

To start the background, I first cut a piece of white card stock measuring 3 1/4" x 4.75". From there, I selected this cute tag and seperated the die to only use the circle and ran it through the die cutting machine six (6) times using various designer papers. 

Next, I placed the circles randomly onto the card stock and trimmed off any excess as I placed a couple of circles past the cardstock edges.

From there, I moved onto creating the little shaker by die cutting this cute tag using kraft cardstock as well as fun foam. In addition, one (1) white stitched circle was cut. 

Next, I flipped over the tag (Kraft) and first added some acetate using some glue to cover the open circle. From there, more glue was added on top of the acetate to adhere the fun foam. 

Again, I prefer using glue as it allows me to move it slightly to match perfectly, but you can use any adhesive. Afterwards, I lay a clear block on top of it for a few minutes to allow the glue to dry. 

Sometimes I'll create the shaker to be on it's own while other times, I'll create the shaker directly onto the card. Here, you can see I decided to create the shaker to be independent. 

To do this, I used the same tag from the  Stitched Essentials 1 setand ran it through the machine using white card stock and added the previously cut stitched circle on top. Instead of guessing where the circle goes, I did die cut another tag to place on top to use as a template. Once, the circle was added, I removed the template.  

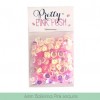
I love the iridescent sequins collection as it provides an extra sparkle and based on how the light hits, it's shows off so beautiful, so I pulled out one of my favorite colors:  4mm Ballerina Pink sequins. 

From there, I added some more glue onto the tag before adding the top onto it. Again, I do add a clear block for a few minutes while the glue dries.  

To add some more dimension, fun foam was added under the background card stock before adhering it onto the card base.

Once again, I pulled out the Birdie Friends stamp set as it has this adorable little chick who appears to be sending a little kiss along with using the Birdie Friends Coordinating die to help me cut it perfectly. 

Final touch was adding a little gold bow by using the Twine and Bow die and added one of my favorite sayings "Hugs", again from the Birdie Friends stamp set 


Thursday, September 22, 2016

Mini Shakers - Get Well Cards

Many of my friends have not been doing well, so I thought I would create some quick mini shaker cards using the Stitched Photo Frames from Pretty Pink Posh to send out to them as to cheer them up.  

To start this mini card, I pulled out some white card stock and cut a 5" x 7" piece which I folded in half. This way, the finished card size is 3.5" x 5". 

Here is my card: 
From there, I cut a piece of white card stock measuring 3 1/4" x 4.75" and added some designer paper using the 6x6 inch Perfectly Plaid from Lawn Fawn as my background. To give it some dimension, I added some white fun foam underneath the panel. 

I do love these Stitched Photo Frames and thought it would be perfect to use for these mini shaker cards as it's easy to make several of them. 

If you’re wondering what paper I used for the top of the photo frame, it's called Beachside from Lawn Fawn. 

Now for this shaker, I thought it would be nice to have the sentiment on the inside of the shaker, so I pulled out the Rainy Days stamp set from Pretty Pink Posh as it has some of the best sayings for cheering up someone. 

Next, I added some 6mm iridescent sequins using the following colors: Balleria Pink and 
Ocean Spray, but since I wanted some pink as well, I added some 6mm Pink Peonies and love the combination of the sparkles together. What do you think?

I realized I had this little raccoon colored already from the Three Amigos set of Mama Elephant already done, so I thought it would be great to add and use one more sentiment from the Rainy Days set to say "Get Well Soon".


SUPPLIES:


Tuesday, January 19, 2016

MFTWSC263 - Sending You Love and Get Well

Hope everyone is enjoying their day! I needed a get well card to send to one of my friends and what better way but to send some love over. Therefore, I pulled out some more goodies and used the current sketch MFTWSC263 over at MFT Card Challenges to join the fun. 


Here is my card: 
As you can see, I kept this card Clean and Simple and added some watercoloring in the background with a light blue color to add some contrast. Than pulled out this cute panda from the Happy Pandas set as I thought it would be perfect for this card. 

For the sentiment, I die cut the word LOVE from the LLD Accent it - Celebrate die-namics using some Electric Red cardstock. Next, I used the same stamp set for the words "Sending You" and embossed it using white powder. 

To add some more details, I added several hearts from the Tag Builder Blueprints 3 using Pink Lemonade and more Electric Red. Than, I might have have gone a little crazy adding in these new little Gold Mini Star Confetti from Pretty Pink Posh but absolutely love them and couldn't resist.

As always, if you haven't checked out the challenge, please stop over to check out all the inspiration.

Monday, December 14, 2015

Wishing You Sunshine and Get Well

I couldn't pass up joining over at Just Us Girls with their trend week #323 using sequins as I've been loving all of the colors of sequins and playing alot with them. In addition, it gave me a chance to create a get well card for someone I found out recently was in a car accident. 

Here is my card:
Playing with a couple of my favorite stamp set: Holiday Pals from Pretty Pink Posh as I love these little critters and little accessories so I pulled out the little bunny, penguin, and cute little bow. Then I pulled out: Rainy Days for the umbrella, clouds, little smile, and sentiment.

Next, I created the circle by using the Stitched Circle die by Simon Says Stamp and pulled out the tiny dots stencil to add some texture paste. 

Since I wanted to add some color behind the little critters, I pulled out 2 inks from Altenew: Frosty Pink and Mango Smoothie to add to the circle. Added some fun foam under the rectangle to add some dimension along with adding foam mount under the umbrella and animals. 

Last but not least, colored using my copic marker and added some 4m clear sequins by Pretty Pink Posh and white embossed the sentiment. As always, if you haven't checked out the challenge, please stop over to check out all the inspiration.

SUPPLIES: