Tuesday, May 17, 2016

Happy Birthday with Flowers

Catching up on all of my birthday cards as another one of my sweet friends over at Instagram celebrated her birthday. So I created another shaker card and also joining over at Simon Says Stamp Wednesday challenge with "Flowers"  and "SSSflickrchallenge#45where the theme is "Anything Goes. 
Here is my card: 
This was so much fun to make as I always enjoy ink blending. So, to get me started, I embossed several images from the Spring Flowers set from Simon Says Stamp using white embossing powder from Ranger and than moved onto coloring them using Simon Says Stamp inks:  

For the leaves, I used Jellybean and Green Leaf 
Flowers: Teeny Bikini, Hot Mama, and Maliblue

For the butterfly, I used my copic markers: Y11, Y15, Y17 (yellows) BG11, BG45 (blues), E37 body

For the background, I pulled out the Triangle Screen cover die from MFT and die cut using white cardstock. From there, I layed it on top of Pearl White Shimmer cardstock from Crafters Companion for an white shimmer look. 

Next, I pulled out this adorable Stitched Banner Duo 2 die from Pretty Pink Posh to create the shaker element using Pearl White shimmer cardstock along with this awesome new 4mm Metallic Rose Gold which I'm reaching for quite often. 

I don't want to forget, the sentiment is from the Friendship Blooms set, also from Simon Says Stamp 
As always, if you haven't checked out the challenge, please stop over to check out the amazing inspiration over there. 

SUPPLIES:


Thursday, May 12, 2016

Pretty Pink Posh May New Release Blog Hop

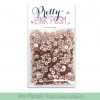
Welcome!! I'm so excited this month to showcase Pretty Pink Posh's new product release for May. It's absolutely amazing with adorable new dies, and tons of fabulous sequins, including Rose Gold. 

You should have arrived from Joni Andaya blog, but if you get lost, no worries, there is a complete line up list below so you can stay on track during the blog hop. 


I'm beyond thrilled to share these two cards with you today, so let's get started.

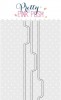
Here, I used this beautiful new Storybook 4 Die which is perfect to create different scenes with these four little squares on each corner, rectangle right in the center, plus wonderful stitching I love on cards. 

Here, I started the card off by first creating the sky where I used the clouds border from the Stitched borders 2 collection along with my ink blending tool. Basically, I used the clouds border as a stencil and guide of where I wanted clouds. 

Next, I pulled out one of my favorite sets, Rainy Days to stamp some rain onto the card stock. From there, I ran the card stock using the new Storybook 4 Die to get the little squares with the clouds and rain.  

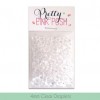
Next, I added some 4mm sparkling clear sequins into the shaker element and went on to decorate the top of this card which is to celebrate a new baby boy. 

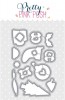
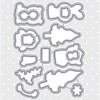
Once again, I used the Rainy Days set to stamp out the two umbrellas and handles along with using the Rainy Days coordinating dies to help me cut them out. 

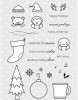
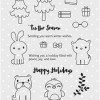
I'm in love with this penguin and cute little bear from the Winter Friends set so I couldn't resist but to use them. Again, I used the Winter Friends coordinating dies  to help me cut them out which made it go fast and easy. To add a little more dimension, I popped them up using foam mount tape. 

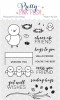
Last but not least, I embossed the sentiment from the Rainy Days using white embossing powder and placed it in the center of the card. 

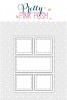
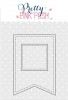
For this next card, I used several dies to create some dimension. First, I started off by die cutting the Scallop Square Frames, using the largest one and popped it up using white fun foam. 

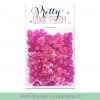
From there, I used this new adorable Stitched Essential dies to create a mini shaker for the focal point along with using some new iridescent 4mm Fairytale Fuchsia sequins that sparkle. 

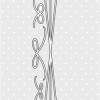
From there, I thought it would great to use the Twine and Bow from Pretty Pink Posh to create a ribbon look across the square using white and gold card stock. From there, I pulled out these fabulous Stitched Tabs to add along the card to add several sentiments. 

Last but not least, I added some 4mm clear droplets around the mini shaker along with some Raspberry Flowers from the Summer Flower Sequins Mix. to add few more sparkles to this Happy Birthday card.  

Let's continue celebrating with your next stop at Heather Pulvirenti 

GIVEAWAY! During this blog hop, there will be (2) $25 Gift Certificates to Pretty Pink Posh up for grabs.

Winners will be picked randomly along the blog hop (comments must be left by 11:59PM PDT on 5/16/16), and will be announced on the Pretty Pink Posh Blog! 

Here is the complete list of Blog Hop Participants:

Thank-you so much for stopping by and continue enjoying the blog hop! 

Don't forget all of the new products are available to order now over at Pretty Pink Posh


Wednesday, May 11, 2016

Sending Big Hugs Your Way!

I'm back again today with another card and must say that I truly wish this cold would go away completely, but it seems it loves me to much.....lol. On a positive note, I was still able to play and have fun creating this card and can't wait for tommorrow's Pretty Pink Posh blog hop to see lots of inspiration and creativity. 
Here is my card: 
To start this card, I pulled out the Falling Hearts stencil from Simon Says Stamp along with some Picked Raspberry distress ink. Next, I wanted to play with some dies and always enjoy combining different ones together, so I die cut the Stitched Banner Duo from Pretty Pink Posh, which until today is one of my favorites.

Next, I wanted to use the background piece I previous created with the water lifting technique as it's been staring at me for awhile now waiting to be used. You can click here to see that post. Then I wanted to use some beautiful new 4mm Metallic Rose Gold sequins, so I figured to created another shaker card. 

I'm in love with this Scallop Circle from Pretty Pink Posh and find myself reaching for it quite often as I love the inverted little scallops and detailed stitching on top. 

Next, I pulled out this adorable Birdie Friends stamp set and water colored using some Zig Clean Color Brush to create this scene along with using the coordinating matching dies which make it easy to cut the images. 

Since I wanted to add little bows, I pulled out the Holiday Pals set and added them to all three little birds. Again, can't wait until tommorrow to check out Pretty Pink Posh's blog hop. 


SUPPLIES:


Saturday, May 7, 2016

Hello Friend


Since I noticed I don't have very many masculine cards, please I needed one, I figured to create one using a different color combination than what I normally use. So here, I went with some neutral colors and found that I love this color combo.  

For the base, I die cut a rectangle using the Neutrals Dots & Stripes paper pack from MFT to get me started. Next, I pulled out this beautiful Scallop Frame from Pretty Pink Posh along with some chocolate card stock and ran it through the die cut machine and once again using white fun foam.

I love using white fun foam to pop things up, plus for me it's easy to line it up and place card stock over it. 
Then I got to play with some of the new goodies from Pretty Pink Posh's May release such as this adorable Stiched Essentials 1 Die which has three miniature tags to choose from. Here, I used one of the tags to create a little mini shaker and added some new 4mm Rose Gold sequins inside.

Next, I pulled out this cute little dog from the Holiday Pals stamp set and colored it using my copic markers and popped it up using foam mount tape and added the sentiment using the Birdie Friends set. Again, love the font style and sayings of this set. 

To finish off this card, I added some 4mm clear droplets to add just a bit of sparkles.

SUPPLIES: