Sunday, August 30, 2015

Happy Birthday Full of Pink with Sweet Animals

Wanted to make a special birthday card for one of my IG (Instagram) friends, Olya (pershina_olya) who is celebrating her birthday and wanted to wish her a wonderful Happy Birthday and hope she enjoys all year round. Also, joining over with this week's challenge over at Simon Says Stamp Wednesday blog with the theme of "Anything Goes" plus also joining Seize The Birthday.
Here is my card:
Here I started with my blueprints 20 which is another favorite of mine with Pink Lemonade scallop base. From there, I used the same blueprint to die cut the stitched rectangle from the Dots and Strips Sorbet paper pad from MFT

Next, I moved on to create this shaker card using the Stitched Duo 3 from Pretty Pink Posh and added several sequins from some of their irridescent collection: Ballerina Pink, and Strawberry Burst, along with Pink Blush, some seed beads, and a few more little sequins as well. 

If your wondering where the bow comes from, it's from the blueprint 17 where I used white cardstock along with Pink Lemonade for the center. Next, I moved onto coloring these cute little animals from the stamp set: Baby Party Animals from Simon Says Stamps using my copic markers. They are so cute and fun and perfect for a party celebration. 

As always, if you haven't checked out the challenge, please stop over to check out all the inspiration.

Supplies Used: 
Stamp Set: Baby Party Animals (SSS), 
Card stock and Paper: White, Pink Lemonade, Sno Cone, Dots & Strips Sorbet Paper Pad (MFT)  
Inks: Copics Markers
Accessories:  Blueprint 20 & 17 (MFT), Acetate Sheet (Crafter's Companion), Sequins (Pretty Pink Posh), Foam Mount


Tuesday, August 25, 2015

MFTWSC242 - Happy Birthday with Sweet Panda

Didn't want to miss out on this cute sketch over at the MFT Card Challenges with MFTWSC242 so pulled out some fun stuff and got to playing. Also, squeezing in one more birthday card over at Seize the Birthday.
Here is my card:
I'm sure you can guess on which blueprint I used here, but just in case your not sure, it's Blueprint 26 where I wanted to focus once again on using the dies in the set. It's one of my favorites....how about your? This cute little panda came from the stamp set called: Happy Panda
Here I used the Diagonal Stencil to emboss the base background giving it some texture. Also, for the sentiments, I stacked them together by cutting out 3 in total (2 in white and 1 in Orange Fizz which I than glued together using Tac Gem. 

For the word "Happy", I did the same thing, but glued the orange fizz slightly more towards the right to give it a shadow look.
Almost forgot about the big ballon in the center which I'm sure you can't miss on this card. Used Sour Apple cardstock where I added texture paste using the stars stencil. Also, added the bows and a little sequins to finish it off along with some white dots using my sharpie pen.

As always, if you haven't checked out the lesson or challenge, please stop over to check out all the inspiration.

Supplies Used: 
Stamp Set: Happy Panda (MFT), 
Card stock and Paper: White, Summer Splash, Orange Fizz, Sour Apple (MFT)  
Inks: Copics Markers
Accessories:  Blueprint 26 (MFT), Diagonal Stencil (MFT), White Sharpie Pen, Sequins (Pretty Pink Posh), 

Friday, August 21, 2015

Repetition - For You on Your Birthday!

Needed another birthday card, so I decided to make one based on repetition from Lesson #11 over at the MFT Summer School along with Lesson #14 of color satuaration where I combined the low satuarated colors with the high saturated colors. Than as I was thinking of it, I remmember my friend loves shaker cards, so I incorporated that as well. Also joining over at Seize The Birthday  

 
Here is my card:
Here I worked with Blueprints 23 and focused on using only the dies from this set to create my base and card aside from the flowers which are from the stamp set: Modern Blooms. I loved using the low saturated colors against the high saturated colors for the flowers along with the repetition of the flowers and circles.

For the pink, I used Cotton Candy and Ripe Raspberry, for the blues, I used Summer Splash and Tropical Teal, and for the orange, I used Peach Bellini and Persimmon.
After, I die the center white panel, I used the grid stencil to emboss it giving it some added texture. For the scallop edges, I used the Steel Blue cardstock. Next, I added some acetate and foam mount around the circles and along the edges of the panel. Added sequins from Pretty Pink Posh to match up with the colors of the flowers.
Here is a close up view of the embossed grid stencil on the white panel. Also, I used foam mount to pop up the flowers. Added the little yellow buttons with Lemon Chiffon card stock using the same Blueprint 23. Last but not least, added a white dot to the center of each flower using my white sharpie pen.  
For the sentiment, I used the stamp set: Birthday Bears and white embossed it against black licorice card stock and used one of the banner die from blueprints 23 to cut it.

As always, if you haven't checked out the lesson or challenge, please stop over to check out all the inspiration.

Supplies Used: 
Stamp Set:  Modern Blooms (MFT), Birthday Bears (MFT)
Card stock and Paper: White, Black Licorice, Steel Blue (MFT)  
Inks: Cotton Candy, Ripe Raspberry, Summer Splash, Tropical Teal, Peach Bellini, Persimmon
Accessories:  Blueprint 23 (MFT), Modern Blooms Die (MFT), Grid Stencil (MFT), White Sharpie Pen, Sequins (Pretty Pink Posh), Foam Mount.

Tuesday, August 18, 2015

Dream Big

Wanted to do one more card for the Pop Up Challenge Kathy over at The Daily Marker is hosting from Aug 14th through Aug 17th and wanted to try out these eyelash technique she showed on Day 4 this post.

Here is my card:
Started off using my Blueprints 13 for my stitched base rectangle. Next, I embossed the sentiment using white embossing powder and used the Banner Bundle Die from Verve along with some black licorice card stock. Than, I added it to the card base and stamped the butterflies around the sentiment.
Aren't these butterflies so cute? It's from the stamp set called: Sparkly Dreams by Verve which I colored with my copic markers using a variety of color combos. Than, I added the details of the eyelashes to each butterfly using copic multi liner, but before that, I added an outline around the butterflies using my C1 copic marker to make them pop out a little more. It's very light but makes a difference.

Added some black cardstock under the white base and popped it up using craft foam. Last but not least added some sequins to finish it off and took my white sharpie pen to add a few dots.

If you haven't checked out Kathy's website, please stop over to check out all the inspiration she has.

Supplies Used: 
Stamp Set:  Sparkly Dreams (Verve)
Card stock and Paper: White, Black Licorice (MFT), X Press It Blending Paper (copic coloring)   
Inks: Black Licorice Hybird (MFT), copic markers, copic multi liner pen
Accessories:  Blueprint 13 (MFT), Banner Bundle Die (Verve), White Sharpie Pen, Sequins (Pretty Pink Posh), Craft Foam

Sunday, August 16, 2015

Happy Birthday for You!

When I saw the topper challene over at Seize The Birthday of anything that flies, I knew I wanted to use this adorable set from Mama Elephant called Tiny Heros. Also, it gave me another chance for some coloring for the Pop Up Challenge Kathy from The Daily Marker is hosting from Aug 14th through Aug 17th.

Here is my card:
Love these cloud dies from Mama Elephant along with these tiny super heros which I colored in using copic markers. Can you guess where I got these bubble sentiments? Well, yes it's from the set called Small Talk. I thought it would be great if each one of the heros had something to say.


When I was looking at this after it was finished, I thought it would have been great to have made it into a shaker card, so than I thought why not have each hero based on the color of outfit match the cloud line they were on, so I went off to add sequins from Pretty Pink Posh. As you can see here, the girl at the bottom is in pink along with the matching cloud lines.

As always, if you haven't checked out the challenge, please stop over to check out all the inspiration.

Supplies Used: 
Stamp Set:  Tiny Heros (Mama Elephant), Small Talk (Mama Elephant)
Card stock and Paper: White, X Press It Blending Paper (copic coloring)   
Inks: Blueberry (MFT), Salty Ocean (Distress), Maliblue (SSS)
Accessories:  Landscape Trio (Mama Elephant), Sequins (Pretty Pink Posh), Blending Tool (Ranger), Foam Mount.

Saturday, August 15, 2015

So Cool - It's Your Birthday!


When I saw lesson 12 over at MFT blog on Symmentry/Asymmetry, I wanted to give it a try based on the lesson side of asymmetry. Also, when I saw the Simon Says Stamp Wednesday challenge on food or drink, I went off to try and combine the two. 

Here is my card:
Started off with creating my background first by using Bold Paisley stencil along with some embossing paste which I mixed using 3 different colors. Summer Splash, Peackcock Feathers Distress, and than, Mowed Lawn Distress. Next, I used my blueprint 15 to cut out the stitched rectangle as my base.
Afterwards, I focused on creating my scene asymmetrical by die-cutting some brown paper bag cardstock using the Stitched Basics die for the sand area. Next, added in these adorable penguins, palm tree, and drink from the set: Penguins From Paradise which were colored in using my copic markers.

Last but not least added the sentiment which is embossed in white using the stamp set called: Totally Happy!. Don't want to forget, there is a Pop up colorig challenge Kathy over at The Daily Marker is hosting from Aug 14th through Aug 17th. Don't want to miss the fun!.

As always, if you haven't checked out the challenge, please stop over to check out all the inspiration.

Supplies Used: 
Stamp Set:  Penguins From Paradise (MFT), Totally Happy (MFT)
Card stock and Paper: White, Brown Paper Bag, Black Licorice (MFT), X Press It Blending Paper (copic coloring)   
Inks: Summer Splash (MFT), Peacok Feathers, Mowed Lawn (Distress)
Accessories:  Blueprints 15 (MFT), Basic Stitched (MFT), Bold Paisley Stencil (MFT), Embossing Paste (Ranger), White embossing powder (Ranger), Foam Mount.

Monday, August 10, 2015

MFTWSC240 - Happy Birthday to You

What a fun sketch over at MFT Card Challenges with MFTWSC240 so wanted to give it a try and play around with some crafty stuff. Also, joining the Seize the Birthday with this week "Anything Goes" with the topping "Embossing". 
Here is my card:
Started with an A2 white card stock base and heat embossed it using white embossing powder along with the background stamp called: Garden Flourish from MFT as I wanted to create a resist background to blend in some color, Tickled Pink, one of my favorite.

Afterwards, I used the stitched A2 rectangle from Blueprints 25 and ran through the die cut machine. Next, I went on to create the middle and decided to use my Pierced Square dies to help me with it.
For the bigger square, I used Ripe Raspberry cardstock and than cut out 4 smaller squares using white and pieced them together. Added some craft foam under the square to elevate this little platform and give it some dimension. 

Added the Leaf Filled Flourish using Green Envy shimmer paper and created the flower using Mini Hybird Heirloom Rose along with felt. The sentiment was from the set called: Pretty Poppies which was heat embossed using white powder. Added some sparkling clear sequins from Pretty Pink Posh to finish off the card.

As always, if you haven't checked out the challenge, please stop over to check out all the inspiration.

Supplies Used: 
Stamp Set:  Pretty Poppies (MFT), Garden Flourish Background (MFT)
Card stock and Paper: White, Ripe Raspberry, Black Licorice (MFT), Green Envy Shimmer (Crafter's Companion),  
Inks: None
Accessories:  Blueprints 25 (MFT), Fishtail Flags (MFT), Pierced Square Stax (MFT), Leaf Filled Flourish (MFT), Mini Hybird Heirloom Rose (MFT), Felt, White embossing powder (Ranger), Sequins (Pretty Pink Posh), Craft Foam

Just Saying Hello

I'm back today with another card and love the idea of using die-cuts to create a card, so when I saw the Work It Wednesday challenge, I thought it would be a perfect time to create a card based on the challenge. In addition, a great chance to use my background that I created.

Here is my card:
Created this background by using ink blending technique. Starting at the bottom with Hot Lips, than Rosie CheeksDuckling, and Jellybean. I must say that I'm in love with this inks right now as they go on beautifully. Next, added the Triangle Screen Cover Up Die from MFT which was than added to the white card base.

Next, I wanted to focus on using just die-cuts, so I pulled out the "Hello" die from Simon Says Stamp and die cut it twice using white card stock and glued them together to create a raised look. Than, I die cut another "Hello" die using black card stock where I added it to the stack but slightly to the right to create a shadow look.

Than, I pulled out this butterfly die from Papertrey Ink called: Life is Beautiful  and die cut the base of the butterfly in white and the top using black card stock. Added some white dots around the butterfly using my white sharpie pen.

As always, if you haven't checked out the challenge, please stop over to check out all the inspiration.

Supplies Used: 
Stamp Set:  
Card stock and Paper: White, Black Licorice (MFT),  
Inks: Hot Lips, Rosie Cheeks, Duckling, Jellybean (SSS)
Accessories:  Triangle Cover Up (MFT), Hello Die (SSS), Life is Beautiful (PTI), White Sharpie Pen 

Thursday, August 6, 2015

Online Card Class - Day 4 More Backgrounds

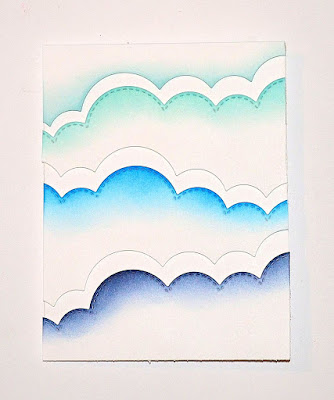
Somehow as I was catching up on my homework for the Online Card Classes  Background Check I landed on Day 4 where Kristina Werner from Kwernerdesigntaught us to use border dies with gaps. I couldn't resist but to try this technique out based on her card.


Here is my card: 
I just loved the way she created this with the clouds. On this card, I used the Clouds border die from Mama Elephant. For the colors, I started with Blueberry (MFT) at the bottom, next going upward, I used Salty Ocean (Distress Ink), Maliblue (SSS), Sea Glass (SSS).

Next card - Same Lesson
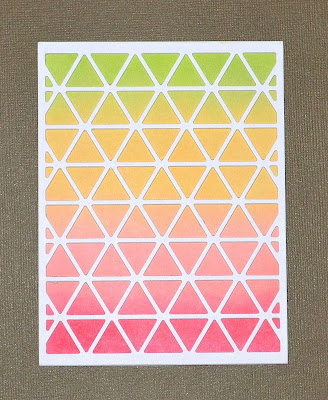
This idea was taught by Kristina to create your own cover plate die and add it to a background with some ink blending. In my case, I didn't have a similar die that I could find to create the cover up. Therefore, I went ahead and used the Triangle Screen Cover Up Die from MFT. More cards to come as I still need to finish them up.

Online Card Class - Day 1 Ink Blending Techniques

These lessons are always amazing over at Online Card Classes  Background Check where you learn various techniques and tips along the way. Lesson 1 focused on ink blending techniques and loved the various ways to create a background which is one of my favorites.

Here is my card: 
This gave me a chance to play with some of the Simon Says Stamp inks where I started from bottom with Hot Lips, than Rosie Cheeks, Duckling, and Jellybean. This one is based on Laura's lesson and blending inks together to create a background. So much fun! Now to make it into a card.

Looks like they will be hosting a flash sale this weekend August 7th thru August 10th for any of their online card classes which are fabulous.